Wednesday, October 24, 2012

Bath Mosaic

 
Bath Mosaic
 
 
Super fast and simple - cut pieces of craft foam into basic shapes - they stick to most smooth surfaces when wet. If you really want to get fancy cut out the parts and pieces to build monsters or make a game of Tic Tac Toe - http://spoonful.com/crafts/tic-tac-tub


Saturday, October 20, 2012

Magic Site Words

It's been a while since I last posted, it's not that we haven't been doing projects, but that we now have a kindergartner in the house. I think the transition into school is harder on the parents than the kids. All the meetings, site words, and field trips. I figure the only way I can post is if I keep it fast and simple.


Magically appearing site words!

I don't want site words to be a chore, and there is only so much site word bingo one little girl can play before she figures out it's really home work. Since A enjoys art so much, lately I've been trying to use more art inspired activities. White crayon and some water colors make identifying site words a lot more fun. So easy and fast!

How do you  keep site words from being a chore?

Saturday, April 28, 2012

Rainbow Bug Art Party

I haven't posted in a while - a combination of beautiful spring weekends too nice to spend at the computer and preparing for A's 5th birthday. For the last 4 years Miss A has celebrated her birthday with a bug party, but there are only so many variations you can do on a theme, so this year I chose the theme - Rainbow Art Party, Miss A managed to convince me to add the bug in at the last minute. Hey what can you do - the girl really likes bugs.

Rainbow Ribbon Garland

Rainbow Birthday Banner
It's hard to capture this one in a picture since is stretch at least 10', but trust me it's cute.
I'll put up instructions later this week.

Rainbow Tutus
More on these later.

Rainbow Punch Box
(You can get the instructions from Pink and Green Mama)

Rainbow Fruit Kabobs

Rainbow Cereal Necklaces.
I also found this idea on Pink and Green Mama - they were so cute I had add them to the party table even though it was last minute. The kids absolutely loved them.

Rainbow Cupcakes
Whew, that's enough for now and we haven't even gotten to the art yet - I'll put our Rainbow Bug Art in a separate post.


Wednesday, March 14, 2012

Rocket Cups - 3, 2, 1, Blast Off!!

Miss A has been watching a lot of documentaries on space lately and Miss G loves all things that go (especially if they are loud), so when I saw the rocket cups in the recent Family Fun Magazine I know they would be a hit with both the girls.

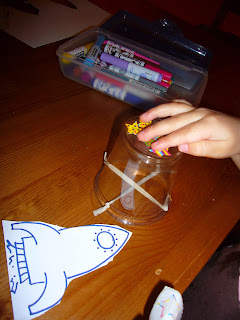
You need 2 cups for each rocket and a rubber band. The rubber band, cut and attached to the cup, acts as the propulsion system. I poked holes in the edge of the cup using a skewer then poked the rubber band through and tied a knot.

The girls of course had to decorate their rockets before the inaugural flights.

To blast off set the rubber band rocket cup over an unaltered cup and push down stretching the rubber bands. It took A a few tries to get the hang of it, but soon she was showing off her rocketeer skills to her dad. G never quite could get the rocket to actually blast off, she just would push it over the other cup then count down and throw her rocket cup into the air (she was still very impressed with the activity).

After mastering the basic blast off we played around with our elastic toys and found that one of the rockets consistently went higher than the other. We fiddled a bit and decided that the tighter the rubber band the higher the rockets went. Not satisfied with that as the final answer A continued experimenting and discovered that the rockets went higher when they were pushed all the way down over the other cup and that if she didn't push the rockets down very far they didn't go very high. To the delight of my kids our rocket with the tightest rubber band almost hit the ceiling when pressed down fully and launched from the dining room table.

What is your favorite way to play with rubber bands?


Photobucket

Fun Stuff Fridays

Friday, March 9, 2012

3 Tips for Cooking with a Toddler

My kids love to help me cook. G in particular loves helping in the kitchen, actually crying if I tell her it's a dish she can't help with. Having such an enthusiactic toddler helper is great and I'm glad we can share special time together, but the help definitley increases the stress in the kitchen. I've found the 3 tips below increase our fun and help me cope with my little kitchen helper.

1- Accept the mess
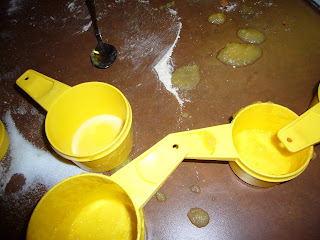
The truth is, cooking with a toddler is messy; that is just the nature of a toddler. Toddlers are explorers; and learning about their world is there job. They need to smear and dribble and splash. For me the best way to deal with the mess is to adjust my expectations. I make sure that G is not in a special outfit, that all items that could be ruined are off the counter, and that I'm not rushed; then I just roll with it. This stage is so fleeting; soon G's motor skills will develope, she will pour accuratly, follow directions, and I will remember fondly how she used to draw pictures in the flour.

2- Prepare, Prepare, Prepare
The more I prepare the more I enjoy cooking with a toddler. If possible I gather my ingredients and do any chopping or peeling while G is distracted elsewhere. Cooking is a lot more fun with a toddler if I don't have to worry about sharp knives or digging through the cupboards for an item. If I turn my back while cooking G will get creative and start adding anything she can get her hands on to the dish (dogfood pie is not so good).

3- Select your recipe carefully
In terms of eating G is a typical picky toddler, until we start cooking. She has to sample almost every ingredient as we cook; a blessing or a curse depending. Tasting raw chicken - very bad! But tasting brocolii she would never touch if it was on her dinner plate - good, good, good. If there is particular food item I really want G to try I will incoporate it into cooking with her. Without the pressure of sitting at the dinner table she is more likely to explore the food, pick it up, play with it, and ultimately taste it. (sneaky - I know). But since I can never be sure what my toddler will put in her mouth while cooking I also make sure that all the incredients in the recipe can be eaten without causing major harm. Below is one of my family's favorite tasteable recipes - Almost Healthy Chocolate Cake.

Almost Healthy Chocolate Cake (adapted from Secrets of Fat Free Baking)
1 3/4 cups whole wheat flour
1 1/4 cups sugar
1/3 cup cocoa powder
2 teaspoons baking soda
1 1/2 cups unsweetened applesauce
3/4 cup skim milk
2 teaspoons vanilla extract
1/4 to 1/2 cup semi sweet chocolate chips or chopped dark chocolate

*Preheat the oven to 325 degrees
*Oil a 9x13 baking pan
*Mix all the ingredient except the chocolate chips in a large bowl - the kids can mix them up in any order and the cake still turns out wonderful. The batter will be a little lumpier than a traditional cake due to the applesauce.
*Pour the batter in the pan then sprinkle the top with the chocolate chips.
*Bake for 50 minutes
*Cool and eat. The cake is quite a bit moister than a traditional cake, more like a cake brownie. I hate to admit that the cake is devoured within about 3 days when we bake it, but if you will be keeping longer it's best to put the cake in the fridge. The cakes moister texture will cause it to spoil quicker if not refrigerated. 

 What are your tips for baking with kids?


Wednesday, February 22, 2012

Pretty Polyhedrons


We have been playing a lot with shapes lately at our house. My Mother sent us a great 3 dimensional thinking game called Trucky 3 by Smart Games. You load different combinations of blocks into the trucks starting out simple and getting more challenging as you progress through the accompanying book. I was surprised by how well A worked thorugh some of the puzzles, so I thought we would give the Paper Plate Polyhedrons from Disney Family Fun a try.

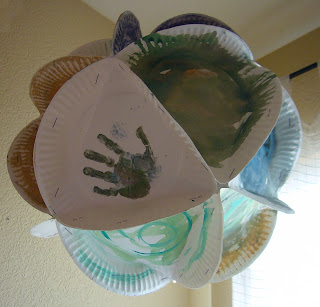
First we painted the 20 paper plates needed for an Icosahedron - beautiful math is a lot more fun.

The next day I created a template of an equal lateral triangle to fold along. Technically the angle in each corner of the triangle should be 60 degrees, but I just eyeballed it. It only took about 15 minutes to fold all the plates, probalby a lot faster than if I had been able to coax the girls into helping.

Since the day was unseasonably warm I took the project outside. I thought for sure the stapler would have gotten the girls interested in the project, but they ran around while I assembled the first portion of the polyhedron - a pentagon of 5 plates stapled together.

At this point G stopped by and thought the pentagon made a nice hat. I snapped a picture then tried to lure A over to join in, but she was not woed by the mathmatical hat. G wondered off and it was just me and the plates again. Such a cool project and so little interest from the kids so far. But I try not to push, so they enjoyed the warm day and slugs while I stapled.

To create the icosahedron I assembled 2 pentagons for the top and bottom and a row of the remaining plates which would connect the pentagons. To make the ball you should have 20 plates total. Make sure you count before you start to assemble. Note there are only 19 plates in this photo, causing a bit of a problem. I got to the end and the polyhedron just wouldn't close. I suspected I was short a plate or 2 , but it's really hard to cound the sides on a round object. My husband was smirking at me as I turned my shape around and a round to trying to get a good count. After removing a couple of staples and adding a plate it all worked out.

 Once the polyhedron was complete I suddenly had the girls full attention. G wanted to bounce it (which by the way I don't recomend) and A wanted to make one of her own. Finally this is what I had been hoping for. I got out another stack of plates and folded some for the girls to play with. They used markers to decorate the plates and then tried holding them together in different ways.

A decided she wanted to make a diamond shape. She thought we should staple 3 plates together, so I held while she stapeled. This created a little pyramid. She made another just the same then we stapled the two together.


Not exactly a diamond, but she was satisfied and I was happy that A was thinking about shapes in all 3 dimensions.


The polyhedrons turned out so lovely we hung them in the corner of the living room, I think we just need to make 2 or 3 more. A bit of an addictive project... what other polyhedrons can we create and what would they look like smaller out of pretty scrap book paper or out of transparent velum. Addictive math is probably a good thing.

How do you play with math?


Photobucket


Fun Stuff Fridays

Sunday, February 19, 2012

Tape Art


I think all kids love tape; I know I did when I was a child. A is no exception. She has a special art drawer with supplies she can use herself anytime, her favorite item being several rolls of colored electrical tape. The other day during nap time / quiet time while daddy dozed and G slept A make the tape art picture above on some scrap cardboard. I love that she came up with this project completely independently. She used her wavy scissors to cut the tape giving the edges a neat texture and tried to combine layers of tape to create green grass.

When I got home from work and saw her latest creation I did a little searching on the Internet and found some other fun tape art.


How do your kids like to create with tape?


Thursday, February 9, 2012

Simplest Carmel Turtle Recipe Ever!

 I first saw this on Tinkerlab and allrecipies.com a while back and have been dying to try them. A small craft party at my house was the perfect excuse. All you need are mini pretzels, Rollos, and pecan halves - any recipe with only has 3 ingredients is all good in my book.

The girls set to work unwrapping the Rollo's while I laid the mini pretzels out on a cookie sheet and preheated the oven to 350 degrees. You can see all the great fine motor practice G is getting unwrapping the candies.

We placed 1 Rollo on each pretzel. Then baked in the oven for exactly 4 minutes, just enough time to soften the Rollos.

Since they were in the oven such a short time the cookie sheet was only warm, so the girls could press the pecan halves into each Rollo without fear of burns. (A is wearing her Fairy dress we made several days before) Once everything was assembled 5 minutes in the refrigerator hardened the treats and they were ready to eat.

YUM! YUM! Chocolaty, carmeley, salty, nutty treats in less than 30 minutes. I think this will be our new Valentine's Day tradition.

Does your family have any traditions for Valentine's Day?

Sunday, February 5, 2012

Paper Bag Fairy Dresses


When I saw the paper bag creative challenge on Tinkerlab I thought of the cute paper bag picture below taken by my friend Stephanie of her son D. 

Inspired by D's Trader Joe's attire we set to work on our own paper bag outfits.

Brown is a nice color and all, but the girls and I decided to add some color to our bags. We cut the bags so that they would lay flat and covered them with paint.

The girls covered themselves with paint as well. (These pictures were so cute I had to include them even though you can see our cluttered floor)

The next day armed with staplers and tape we set to work on creating our dresses. We used the painted paper bags as the bodices of the dresses. A couple of brads and small rubber bands created a simple fastening system.

I used a stapler to attach pieces of tissue paper to the bottoms of the dresses. For A's the tissue paper was attached full length to create a long skirt, for G's I ripped along the length of the tissue paper and attached so that she had a short ruffled skirt. While I stapled, the girls crumpled the tissue paper to make it bunched and fluffy.  After attaching the tissue paper A tried hers on and discovered that she couldn't sit down, I had shorten the paper bag bodice by about 6 inches then reattach the tissue paper. I guess I should measure before charging ahead on a project.

A made flowers out of tissue paper she ripped and twisted together. Apparently smashing the tissue paper is important in making the flowers - when mine didn't look right A squashed it around a bit and it looked much better.

While constructing the outfits the girls decided they were fairy dresses, so A cut some wing shapes out of another paper bag then helped her little sister scribble on some pretty colors. After some difficulty attaching the wings with staples I finally used some clear packing tape which worked quite well.

The dresses turned out great and the girls loved them.

The dresses inspired a lot of spinning.

Cooking in the dresses was fun too. (I'll post this yummy and super easy candy recipe later this week)

The dresses where even good for doing chores like putting away silverware.

Who knew paper was so much fun. What is your favorite thing to make with paper?