Wednesday, February 22, 2012

Pretty Polyhedrons


We have been playing a lot with shapes lately at our house. My Mother sent us a great 3 dimensional thinking game called Trucky 3 by Smart Games. You load different combinations of blocks into the trucks starting out simple and getting more challenging as you progress through the accompanying book. I was surprised by how well A worked thorugh some of the puzzles, so I thought we would give the Paper Plate Polyhedrons from Disney Family Fun a try.

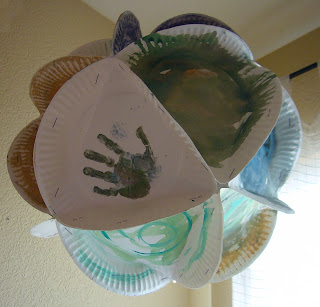
First we painted the 20 paper plates needed for an Icosahedron - beautiful math is a lot more fun.

The next day I created a template of an equal lateral triangle to fold along. Technically the angle in each corner of the triangle should be 60 degrees, but I just eyeballed it. It only took about 15 minutes to fold all the plates, probalby a lot faster than if I had been able to coax the girls into helping.

Since the day was unseasonably warm I took the project outside. I thought for sure the stapler would have gotten the girls interested in the project, but they ran around while I assembled the first portion of the polyhedron - a pentagon of 5 plates stapled together.

At this point G stopped by and thought the pentagon made a nice hat. I snapped a picture then tried to lure A over to join in, but she was not woed by the mathmatical hat. G wondered off and it was just me and the plates again. Such a cool project and so little interest from the kids so far. But I try not to push, so they enjoyed the warm day and slugs while I stapled.

To create the icosahedron I assembled 2 pentagons for the top and bottom and a row of the remaining plates which would connect the pentagons. To make the ball you should have 20 plates total. Make sure you count before you start to assemble. Note there are only 19 plates in this photo, causing a bit of a problem. I got to the end and the polyhedron just wouldn't close. I suspected I was short a plate or 2 , but it's really hard to cound the sides on a round object. My husband was smirking at me as I turned my shape around and a round to trying to get a good count. After removing a couple of staples and adding a plate it all worked out.

 Once the polyhedron was complete I suddenly had the girls full attention. G wanted to bounce it (which by the way I don't recomend) and A wanted to make one of her own. Finally this is what I had been hoping for. I got out another stack of plates and folded some for the girls to play with. They used markers to decorate the plates and then tried holding them together in different ways.

A decided she wanted to make a diamond shape. She thought we should staple 3 plates together, so I held while she stapeled. This created a little pyramid. She made another just the same then we stapled the two together.


Not exactly a diamond, but she was satisfied and I was happy that A was thinking about shapes in all 3 dimensions.


The polyhedrons turned out so lovely we hung them in the corner of the living room, I think we just need to make 2 or 3 more. A bit of an addictive project... what other polyhedrons can we create and what would they look like smaller out of pretty scrap book paper or out of transparent velum. Addictive math is probably a good thing.

How do you play with math?


Photobucket


Fun Stuff Fridays

Sunday, February 19, 2012

Tape Art


I think all kids love tape; I know I did when I was a child. A is no exception. She has a special art drawer with supplies she can use herself anytime, her favorite item being several rolls of colored electrical tape. The other day during nap time / quiet time while daddy dozed and G slept A make the tape art picture above on some scrap cardboard. I love that she came up with this project completely independently. She used her wavy scissors to cut the tape giving the edges a neat texture and tried to combine layers of tape to create green grass.

When I got home from work and saw her latest creation I did a little searching on the Internet and found some other fun tape art.


How do your kids like to create with tape?


Thursday, February 9, 2012

Simplest Carmel Turtle Recipe Ever!

 I first saw this on Tinkerlab and allrecipies.com a while back and have been dying to try them. A small craft party at my house was the perfect excuse. All you need are mini pretzels, Rollos, and pecan halves - any recipe with only has 3 ingredients is all good in my book.

The girls set to work unwrapping the Rollo's while I laid the mini pretzels out on a cookie sheet and preheated the oven to 350 degrees. You can see all the great fine motor practice G is getting unwrapping the candies.

We placed 1 Rollo on each pretzel. Then baked in the oven for exactly 4 minutes, just enough time to soften the Rollos.

Since they were in the oven such a short time the cookie sheet was only warm, so the girls could press the pecan halves into each Rollo without fear of burns. (A is wearing her Fairy dress we made several days before) Once everything was assembled 5 minutes in the refrigerator hardened the treats and they were ready to eat.

YUM! YUM! Chocolaty, carmeley, salty, nutty treats in less than 30 minutes. I think this will be our new Valentine's Day tradition.

Does your family have any traditions for Valentine's Day?

Sunday, February 5, 2012

Paper Bag Fairy Dresses


When I saw the paper bag creative challenge on Tinkerlab I thought of the cute paper bag picture below taken by my friend Stephanie of her son D. 

Inspired by D's Trader Joe's attire we set to work on our own paper bag outfits.

Brown is a nice color and all, but the girls and I decided to add some color to our bags. We cut the bags so that they would lay flat and covered them with paint.

The girls covered themselves with paint as well. (These pictures were so cute I had to include them even though you can see our cluttered floor)

The next day armed with staplers and tape we set to work on creating our dresses. We used the painted paper bags as the bodices of the dresses. A couple of brads and small rubber bands created a simple fastening system.

I used a stapler to attach pieces of tissue paper to the bottoms of the dresses. For A's the tissue paper was attached full length to create a long skirt, for G's I ripped along the length of the tissue paper and attached so that she had a short ruffled skirt. While I stapled, the girls crumpled the tissue paper to make it bunched and fluffy.  After attaching the tissue paper A tried hers on and discovered that she couldn't sit down, I had shorten the paper bag bodice by about 6 inches then reattach the tissue paper. I guess I should measure before charging ahead on a project.

A made flowers out of tissue paper she ripped and twisted together. Apparently smashing the tissue paper is important in making the flowers - when mine didn't look right A squashed it around a bit and it looked much better.

While constructing the outfits the girls decided they were fairy dresses, so A cut some wing shapes out of another paper bag then helped her little sister scribble on some pretty colors. After some difficulty attaching the wings with staples I finally used some clear packing tape which worked quite well.

The dresses turned out great and the girls loved them.

The dresses inspired a lot of spinning.

Cooking in the dresses was fun too. (I'll post this yummy and super easy candy recipe later this week)

The dresses where even good for doing chores like putting away silverware.

Who knew paper was so much fun. What is your favorite thing to make with paper?